Tutoriallearn.com
Easy Learning
Search Tutoriallearn.com :
‹‹ Previous Next ››
Java Applet
- Java Applet is a small application.
- It is transported from server to client machine. Then it runs on client machine. It uses limited resources while running at client machine.
- Applet is used to make the web page dynamic and for processing of inputs received from user.
- Applet provides a graphic user interface for user for interaction.
- Applet does not require main() method for running at client machine.
- Applet program extends 'Applet' class.
Simple Applet Example
import java.awt.*;
import java.applet.*;
public class HelloApplet extends Applet {
	public void paint(Graphics g) {
	g.drawString("Hello Applet", 30, 30);
	}
}
Explanation of the program
- To write an Applet program, first import packages java.awt.* and java.applet.* , then creates a class, in this case, HelloApplet which extends Applet class.
- Remember, Applet class is pre-defined class provided by Java and HelloApplet is class which is defined by programmer.
- Within HelloApplet class, paint() method is overridden.
- Method paint() has one argument of type Graphics to create Graphical Context for the applet program.
- Method drawString() of Graphics class is called through the object g which is of Graphics type.
- Method drawString() is used to display text message on the Applet window.
There are three methods to run an applet.
Method 1: Running Applet using Java compatible browser
- To execute an applet in a web browser, you need to write a HTML file that contains Applet tag.
- Applet tag of HTML loads the applet.
- Following tag should be included in the HTML file.
<applet code="HelloApplet.class" width=200 height=60 >
Method 2: Running Applet using standard tool appletviewer
- HTML file made in method 1 can be run using applet tool appletviewer .
- Assume HTML file name is AppletRun.html, then this file can be run using appletviewer .
- For Example:
C:\>appletviewer AppletRun.html
Method 3: Including Applet tag in Java source file
- In this method, Applet tag is included in Java source file in the comment.
- To including Applet tag in the above example, it will look like:
import java.awt.*;
import java.applet.*;
/*
<applet code="HelloApplet.class" width=200 height=60>
*/
public class HelloApplet extends Applet {
	public void paint(Graphics g) {
	g.drawString("Hello Applet", 30, 30);
	}
}
- By doing this, compiled code is documented with a prototype of the necessary HTML statements.
- Now, you can directly run the applet using appletviewer .
Important methods of Applet programming
- init() method
- This is first method which is called when an applet is running.
- It is used to initialize the variables.
- It is called only once during the run time of the applet.
- start( ) method
- This method is called after init() method.
- It is used to restart the applet.
- When a user leaves a web page and comes back, then the start() method resumes the execution of the applet.
- start() method is called each time whenever an applet needs to be displayed on the screen.
- paint() method
- This is the method where you will do most of the applet programming.
- This method is called each time when applet's output is to be redrawn.
Example:Showing init(), start( ) & paint() method
import java.awt.*;
import java.applet.*;
/*
<applet code="DemoApplet.class" width=300 height=50>
*/
public class DemoApplet extends Applet {
String m1;
// set the foreground and background colors.
public void init() {
setBackground(Color.green);
setForeground(Color.red);
m1 = " Within init method (),";
}
// Initialize the string to be displayed.
public void start() {
m1 += " Within Start() Method, ";
}
// Display msg in applet window.
public void paint(Graphics g) {
m1 += " Within paint() Method.";
g.drawString(m1, 20, 40);
}
}
Program is showing sequenece of Applet methods call.
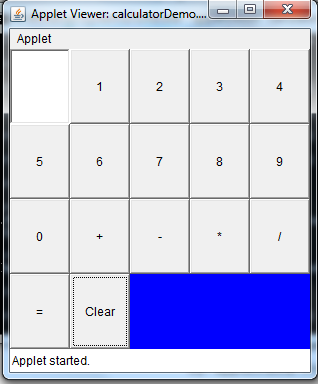
Example: Calculator Program using Applet
import java.applet.*;
import java.awt.*;
import java.awt.event.*;

public class calculatorDemo extends Applet implements ActionListener
{
 String s,s1,s2,s3,s4;
 Button b1,b2,b3,b4,b5,b6,b7,b8,b9,b0;
 Button add,sub,eq,cl,mul,div;
 TextField t1;
 int a,b,c;

 public void init()
 {
	 // Creating TextField and Buttons
  t1=new TextField(10);
  b1=new Button("1");
  b2=new Button("2");
  b3=new Button("3");
  b4=new Button("4");
  b5=new Button("5");
  b6=new Button("6");
  b7=new Button("7");
  b8=new Button("8");
  b9=new Button("9");
  b0=new Button("0");
  add=new Button("+");
  sub=new Button("-");
  mul=new Button("*");
  div=new Button("/");
  eq=new Button("=");
  cl=new Button("Clear");

  GridLayout gb=new GridLayout(4,5);   // setting the Grid Layout
  setLayout(gb);

  // adding AWT controls Textfield and Buttons to the Grid Layout
  add(t1);
  add(b1);
  add(b2);
  add(b3);
  add(b4);
  add(b5);
  add(b6);
  add(b7);
  add(b8);
  add(b9);
  add(b0);
  add(add);
  add(sub);
  add(mul);
  add(div);
  add(eq);
  add(cl);

  // Registration of Event Listner
  b1.addActionListener(this);
  b2.addActionListener(this);
  b3.addActionListener(this);
  b4.addActionListener(this);
  b5.addActionListener(this);
  b6.addActionListener(this);
  b7.addActionListener(this);
  b8.addActionListener(this);
  b9.addActionListener(this);
  b0.addActionListener(this);
  add.addActionListener(this);
  sub.addActionListener(this);
  mul.addActionListener(this);
  div.addActionListener(this);
  eq.addActionListener(this);
  cl.addActionListener(this);

  paint();
 }
 public void paint()
 {
  setBackground(Color.blue);
 }

 // Following method is called when event (like click event) occurs
 public void actionPerformed(ActionEvent e)
 {
  s=e.getActionCommand();
  if(s.equals("0")||s.equals("1")||s.equals("2")||
s.equals("3")||s.equals("4")||s.equals("5")||s.equals("6")||s.equals("7")||s.equals("8")||
s.equals("9")||s.equals("0"))
  {
   s1=t1.getText()+s;
   t1.setText(s1);
  }
  if(s.equals("+"))
  {
     s2=t1.getText();
     t1.setText("");
     s3="+";
  }
  if(s.equals("-"))
  {
     s2=t1.getText();
     t1.setText("");
     s3="-";
  }
  if(s.equals("*"))
  {
     s2=t1.getText();
     t1.setText("");
     s3="*";
  }
  if(s.equals("/"))
  {
     s2=t1.getText();
     t1.setText("");
     s3="/";
  }
  if(s.equals("="))  // On pressing '=' button, arithmetic operation is performed.
  {
   s4=t1.getText();
   a=Integer.parseInt(s2);
   b=Integer.parseInt(s4);
   if(s3.equals("+"))
    c=a+b;
   if(s3.equals("-"))
    c=a-b;
   if(s3.equals("*"))
    c=a*b;
   if(s3.equals("/"))
    c=a/b;
   t1.setText(String.valueOf(c));
  }
  if(s.equals("Clear"))
  {
   t1.setText("");
  }
 }
}
HTML file of Calculator Applet program
calculatorDemo.html
<html>
<body>
<applet code="calculatorDemo.class" width="300" height="300">
</applet>
</body>
</html>
Running the calculator Program
Use appletviewer command of java
c:\> javac calculatorDemo.java
c:\> appletviewer calculatorDemo.html
- Remember calculatorDemo class file and calculatorDemo.html file should be in the same director.
- Html file for running the applet may have any name. It may have name different from the java class name.
Output
‹‹ Previous Next ››